Adjusting & Making a Bone Nut for Electric Guitar (Professional Luthier Guide)
 6")
As a lecturer-style overview for serious players and builders, this guide explains why the bone nut matters, how to make one from scratch, and what numbers to target for reliable results.
Why a Bone Nut for Electric Guitar?
The nut is the first contact point of open strings. Its material and geometry define open-string tone, sustain, and tuning stability. Bone offers a rare combination of hardness, crisp attack, natural lubrication (from micro-porosity), and an organic frequency response that suits single-coil and humbucker instruments alike. Unlike plastic, a bone nut resists deformation under string pressure, maintaining consistent action and intonation.
- Tone: Clear transients, balanced overtones, improved note separation.
- Longevity: High wear resistance reduces slot deformation and binding.
- Stability: Properly angled, polished bone slots reduce “pinging” and help tremolo systems return to pitch.
When to Replace vs. Adjust
Choose adjustment (minor slot deepening, polishing, or lubrication) when string height at the first fret is slightly high, or when there’s mild binding. Choose a full replacement when:
- Slots are cut too deep (open-string buzz at the first fret even with correct relief).
- Slot spacing is uneven or off-center relative to the fretboard edges.
- The nut is cracked, sloppy in the slot, or made from soft plastic.
- The guitar needs a different string gauge profile (e.g., moving from .009–.042 to .010–.046).
 7")
Tools & Materials
Essential
- Pre-cut bone nut blank (unbleached preferred for density)
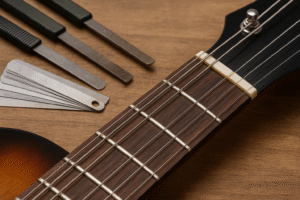
- Nut files matched to string gauges (E–e)
- Feeler gauges (0.20–0.60 mm / .008–.024″)
- Calipers, small ruler (with mm & inch)
- Flat file, sandpapers (400–2000 grit), micropolish pads
- Masking tape, sharp scribe or pencil
- Tiny drop of PVA or gel CA (for final set)
Helpful
- Fretboard radius gauges
- String spacing rule or calculator
- Small back-saw for shaping
- Nut slot lubricant (dry PTFE or graphite)
- Neck support cradle
Key Measurements & Target Slot Heights
With the neck relief set and the guitar tuned to pitch, measure string height over the first fret. Typical electric targets are:
| String | Target over 1st fret (in) | Target over 1st fret (mm) |
|---|---|---|
| High e (1) | .016–.020 | 0.41–0.51 |
| B (2) | .018–.022 | 0.46–0.56 |
| G (3) | .018–.024 | 0.46–0.61 |
| D (4) | .020–.024 | 0.51–0.61 |
| A (5) | .022–.026 | 0.56–0.66 |
| Low E (6) | .022–.028 | 0.56–0.71 |
Lecturer’s note: Use these as musical starting points. Players with an aggressive attack or heavy strings may prefer the upper end of each range.
 8")
Removing the Old Nut
- Score the finish along nut edges with a sharp blade to prevent chipping.
- Relieve the bond: Two or three light taps from the fretboard side with a small block usually pops a lightly glued nut. If needed, saw a central kerf and collapse the nut inward to avoid headstock damage.
- Clean the slot with a flat file; keep the bottom flat and square.
Avoid prying against the headstock face; use controlled taps parallel to the fretboard.
Shaping a New Bone Nut
- Thickness & length: Fit the blank to the slot width and pocket length. It should slide in snugly without force.
- Bottom flatness: Check against a glass plate and 400-grit paper. Any rocking will cause inconsistent action.
- Top radius: Rough in the crown to roughly match the fretboard radius, leaving extra height for slotting.
- Face alignment: The fingerboard face of the nut must be dead square; this is the string’s take-off point.
 9")
Cutting & Polishing the Slots
1) Mark spacing
Use a string spacing rule or a trusted calculator for progressive spacing that accounts for thicker bass strings. Center the outer E strings so there’s safe margin from fretboard edges (commonly ~3.0–3.5 mm on modern electrics).
2) Start the slots
With a fine saw or the lightest stroke of each nut file, create a witness mark at the layout lines. Aim each slot toward its tuner post to minimize side friction, especially on 3+3 headstocks.
3) Cut to height
Bring each slot down gradually. Use a stacked feeler gauge on the first fret as a stop (example: if targeting .020″, stack to .020″ and file until the string just kisses the gauge). Retune frequently—strings under pitch can mask a too-low slot.
4) Shape the break point & back-angle
The highest point must be at the fingerboard face of the nut; gently slope the remainder toward the tuners. Keep the slot semicircular, matching each string gauge (slightly larger is safer than smaller).
5) Smooth & polish
Finish slot walls with 800–2000 grit abrasives pulled through the slot, then buff the crown of the nut. A glossy surface reduces micro-binding and “ping.”
 10")
Final Setup, Lubrication & Tuning Stability
- Glue sparingly: One tiny drop of PVA or gel CA under the nut’s center is enough. Excess glue complicates future service.
- Lubricate: Apply a dry PTFE or graphite to each slot, especially for tremolo use.
- Re-check relief & action: Verify truss rod relief, 12th-fret action, and intonation after the nut work settles.
- String trees & guides: Ensure adequate break angle on flat headstocks; insufficient downforce invites buzz.
For players using vibrato systems (two-point or vintage), slot polish and correct back-angle are as important as the bridge setup and string choice.
Troubleshooting & FAQs
My open strings buzz after cutting the bone nut.
First confirm neck relief; if relief is correct, the affected slot is likely too low. A drop-fill with CA and bone dust can recover ~.003–.006″ (0.08–0.15 mm); otherwise recut a new nut for best results.
Strings “ping” while tuning.
That’s slot friction. Polish the slot walls and slightly widen to match the string gauge. Lubricate. Also check that the slot path points directly at the tuner post.
High action only on the bass side.
Crown may be tilted, or D/A/E slot depths are high. Re-level the crown and bring the bass slots into the target range.
What bone should I choose?
Dense, unbleached bone is consistent and wear-resistant. Bleached bone can be lighter in color but sometimes less uniform.
Do I need specialized nut files?
Yes. Attempts with general saws or sandpaper almost always produce v-shaped slots that bind and detune.
Need a Custom Bone Nut for Your Electric Guitar?
We craft and install precision bone nuts and guitar accessories at bogoworkshop. If you’re in the NY area—or want mail-in service—reach out